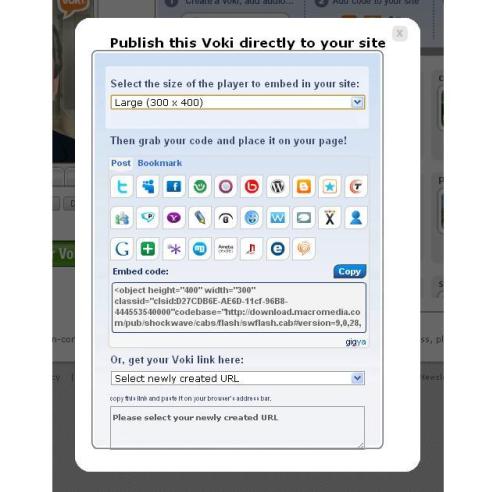
Embedding Voki with the publishing presets is easy! Showcase your Voki on Facebook, Friendster, Twitter and more with just a few clicks.
Step One: After you have created your Voki, added text or voice, and have it ready to go, click Publish Your Voki.
Step Two: Select the size in which you would like to display your Voki. We recommend choosing large for the full Voki effect!
Step Three: Choose the platform where you would like to post your Voki. If you do not see a quick option for a particular site or blog, grab the embed code below. Once you click the code, it is automatically copied and ready to paste on your website.
Some sites, such as WordPress, require a bit of massaging to embed your Voki on the page. For WordPress instructions, please check out our past Voki Tip of the Week, How to Embed Voki on WordPress.
We hope you have fun creating your Vokis and sharing them with your students, teachers, and friends! If you have any questions or issues with embedding, please let us know in the comments section or by sending us an e-mail to feedback@voki.com.
Sincerely,
The Voki Team

I have successfully created a voki and clicked on publish. I want to embed it straight into my blog. When I sign in to my blog I use my google details (email and password). The problem I am encountering is that I manage 4 blogs under my one google account. I click on blogger username and blogger password and it comes up with a blog address that is not one of my blogs. I can click in it and change it to the url address for the blog I am wanting to embed it in but the message ‘failed’ keeps coming up when I click. ???
LikeLike
There is the option of embedding the Voki as a post. To do so, check out our blog post on how to make Voki a WordPress widget. This also works for embedding on blog posts!
To find out more, click the link: https://blog.voki.com/2012/02/01/voki-tip-of-the-week-voki-as-a-widget-on-wordpress/
If you need additional help, please send us an email to feedback [at] voki.com.
Thanks,
The Voki Team
LikeLike
This is not the window that opens when I select Publish on my Voki. I’m not given an embedding code, just a URL Link. I would like it to appear on my student’s blog, not a link in a post.
LikeLike
Hi Lanell,
Can you send a screenshot of that to feedback@voki.com?
Eva
The Voki Team
LikeLike