Using Voki on the First Day of School, as a Reflection Tool, and to Introduce Personas

Using Voki on the First Day of School, as a Reflection Tool, and to Introduce Personas

friendship-day_10038964-031914

Although few people would have ever considered my 5th grade classroom “traditional,” I did avoid technology for the bulk of my first decade of teaching!  Nowadays, there are so many amazing tools out there that I wonder how anyone could avoid using technology with their students today.

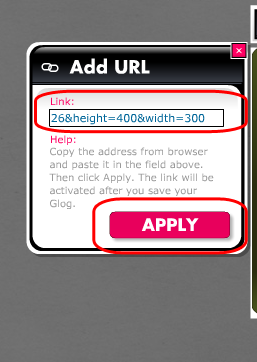
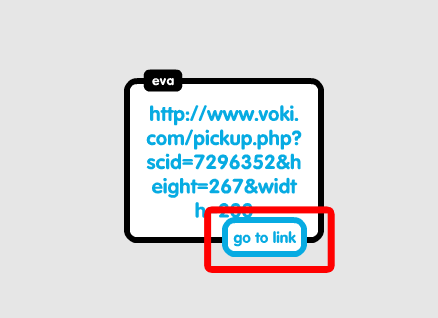
Voki is one of those tools that I use in my classroom to increase motivation and encourage reflection with my students.  One such way I use Voki to increase motivation is on the first day of school.  Since it’s the first day, some of us don’t know everyone.  A mixer is a nice, old-fashioned way of getting to know each other and building community in the classroom.  Instead of the traditional walking around mixer, I decided to do a techie version that requires students to embed a URL on their blog & comment on each others’ posts.  (I bet these 5th graders never expected this on the first day!)

The mixer is called “Two Truths and a Lie.”  Students brainstormed two things that are true about themselves, but that might not be very believable to their peers, and one thing that is actually untrue that might be believable by their peers.  They mix them up & record them on a Voki.  After they are finished, they embed their Voki on their blog for others to listen to.  When people listen, they post a comment with their best guess as to which one might be the lie.  At the end of the period, the students post a comment on their blogs explaining which one was the lie for all to read.

I wanted to get technology into my students’ hands right away because we needed to establish some daily rituals, access some information online, and I needed my kiddos to pass on some details to their parents after school.  I also wanted my students to access their Google Mail accounts to accept invitations to our Weebly site, and learn how to create blog entries.

Here is a link to one of my students’ blog entries where some peers listened to their Voki and posted their guess as to which one of the three facts was actually a lie: http://psolarz.weebly.com/58/post/2012/08/two-truths-and-a-lie.html

Not only is Voki motivational to students, but it also makes an excellent reflection tool.  Rather than have my students complete written reflections after finishing an activity, I occasionally have them create a Voki explaining what they learned from the lesson.

For example, in our unit on the Oregon Trail, my students participate in a simulation where they each become individuals traveling westward in a wagon train.  At the end of each period, I have my students summarize their learning experiences in several different ways, and one of those ways is through a Voki.  The novelty and creative process engage them in the task and often improve their work far beyond traditional written answers.  In addition, students who struggle with writing are able to explain their learning without being encumbered by the written word.  Because they are able to record their voices, they often get into it much more so than when they are writing their reflections or typing them.  Here is our “Voki Journal” of our journey west: http://paulsolarz.weebly.com/voki-blog

Finally, we like to use Voki to introduce ourselves to the other members of the crew headed to colonize Mars.  This is another simulation that we do in our classroom where children learn about the U.S. Constitution and Government through the experience of settling the red planet.  Due to overcrowding in the year 2150, we are forced to try to create a colony on Mars so that the human race can continue!

We are each from a different country and all have different backgrounds and occupations.  I have my students create a Voki introducing themselves, telling us a little bit about where they are from and what their job will be on Mars.  We then embed those Vokis at the top of our ePortfolios so whenever anyone visits our page, they can learn a little bit about our persona in the simulation.  Here is an example (in the top, right-hand corner of the page): http://paulsolarz.weebly.com/6—kendall

Voki has provided my students with a tool that motivates them to try their hardest and have fun doing so!  But be warned, once you teach them how to use this tool, they’re going to ask for it ALL THE TIME!  🙂


paul_solarz

Paul Solarz is a 5th grade teacher in Arlington Heights, Illinois. He is a 2015 Global Teacher Prize Top 50 and author of Learn Like a Pirate.

Voki Tip of the Week: Adding Voki on Canvas

Voki Tip of the Week: Adding Voki on Canvas

Many educators asked us if there is a way to add Voki to their Canvas account/assignments to help enhance their students learning experience. Well, we did find a way to do so and it is very easy! Just follow these steps and you will have a Voki added in no time:

1. Go on voki.com

2. Publish your Voki.

3. Select your Voki size.

4. Click to copy your Voki embed code.

Wiki1


5. Go into your Canvas account and find your course.

1

6. Find your assignment.

2

7. Click HTML Editor.

3

8. Paste Voki Embed code into the editor.

4

9. Add “s” after all http.

5

10. Save or publish your assignment.

11. Your Voki will be added to your Canvas Assignment!

6

Easy right? Have fun and enjoy!

Until next time,

Eva D.

The Voki Team

Voki Tip of the Week: Voki on Glogster

Voki Tip of the Week: Voki on Glogster

Is there a way to embed a Voki on Glogster? 
This is a very common question that we get from teachers! Unfortunately, the answer is no, you can’t embed a Voki on Glogster. But, we found a different way that you can put a Voki on your Glog! Just continue reading to learn how!

Insert as video file

1. Go to www.voki.com.

2. Create and publish your Voki.

3. Save your Voki as a video file. Check out this Tip of the Week on how to turn your Voki into a video file. If you want your Voki video to be bigger, you can view the Voki in full screen.

4. Go to www.glogster.com and sign into your Glogster account.Glog0

5. Create a Glog.Glog1
6. Click upload and find your Voki video file. Find your uploaded Voki video under Video.

Glog2
7. Click on the Voki video and click Use It. Your Voki will be inserted into your Glog.

Glog3
8. To preview your Glog, select preview. To save, click save or publish.Glog4

Insert as picture

1. Go to www.voki.com.

2. Create and publish your Voki.

3. Click the drop down menu and select Large. Then select, Standard Voki link to get the URL.

4. Copy and paste the URL into the address bar. Now you have a bigger Voki on your screen!Glog5
5. Click the Print Screen button on your keyboard.

6. Open Paint and paste the screenshot.

7. Crop the Voki image.Glog6
8. Go to www.glogster.com and sign into your Glogster account.

Glog0
9. Create a Glog.Glog1
10. Click upload and find your Voki picture. Find your uploaded Voki image under Image.Glog2
11. Return to your Voki page and copy the direct link.

Glog8
12. Return to your Glogster page and click on the Voki image. Then click Edit.Glog9
13. Click on Add link.Glog10
14. Paste the Voki link and click apply.Glog11
15. To preview your Glog, select preview. To save, click save or publish.Glog4

If you have any feedback, comments, or suggestion for Voki, send us an email at feedback@voki.com!
Until next time,
The Voki Team

Voki Tip of the Week: Embed Voki on Prezi

Voki Tip of the Week: Embed Voki on Prezi

We have a lot of teachers who uses Prezi for class and Prezi does not have an option to insert an embed code. Don’t worry; we have a solution for showing off your Voki on Prezi. Just follow these simple steps!

  1. Go to www.voki.com.
  2. Create and publish your Voki.
  3. Save your Voki as a video file. (Note: For instructions on how to save your Voki as a video, please read this Tip of the Week.)
  4. Go to www.prezi.com.
  5. Log into your Prezi account.
  6. Click on New Prezi.Prezi1
  7.  Select a template.Prezi2
  8. Click on Insert.
  9. Select From File (PDF, video)…Prezi3
  10. Find your Voki video file and wait for the video to process.Prezi4
  11. Save your Prezi.Prezi5
  12. To save and close your Prezi, click Exit.Prezi6

If you have any feedback, comments, or questions, send an email to feedback@voki.com!

Until next time,

The Voki Team

Voki Tip of the Week: Voki on Popplet

Voki Tip of the Week: Voki on Popplet

We know that some of our Voki teachers use Popplet in their class! What if you want to have your Voki character there? We have the solution here!

Direct Link

  1. Go to www.voki.com.
  2. Create and publish your Voki.
  3. Select your Voki size and copy your Voki link.1
  4. Go to www.popplet.com and sign in.2
  5. Click to Make new popplet and double click to create a popple.3
  6. Paste your Voki link into the popple.4
  7. Hover your mouse over the Voki link and click on Go to link.5

Now you go to your Voki from Popplet!

Note: If you want your Voki to appear in full screen, read this Tip of the week to learn how!

Voki Video

  1. To save your Voki as a video file, check out this Tip of the week.
  2. Upload it on YouTube.
  3. 6Go to www.popplet.com and sign in.2
  4. Click to Make new popplet and double click to create a popple.3
  5. Click on the upload icon.
  6. Click on the YouTube icon.7
  7. Search for your video.8
  8. Select your video and click Add to popple.9

Now you can view your Voki directly on Popplet!

If you have any feedback, comments, or suggestion for Voki, send us an email at feedback@voki.com!

Until next time,

The Voki Team

Voki Tip of the Week: Voki on PowerPoint

Voki Tip of the Week: Voki on PowerPoint

Many teachers use PowerPoint in their lessons and want to put Voki into their presentations. There are several ways of putting Voki onto your PowerPoint presentations.

So we compiled a list (from the simplest way to the hardest way!) on how to put your Voki onto your PowerPoint presentation! Let’s all take a look!

Direct Link to Voki Character

  1. After you published your Voki, select your Voki size.
  2. Select your Voki link.
  3. Highlight and copy your Voki link.
  4. Paste the link into your PowerPoint slide.

Note: You need internet connection during your PowerPoint presentation to view your Voki. You can also view your Voki in full screen by checking out this Tip of the Week.

Voki as a Video

  1. After you published your Voki, create a Voki video. Check out this Tip of the Week on how to turn your Voki into a video file.
  2. In your PowerPoint, click on the Insert tab.
  3. Click on Movie and select Movie from File.
  4. Find and insert your Voki video file.

Note: If you are saving your PowerPoint presentation onto a flash drive, remember to also save your Voki video file in the same location! This will make sure that your Voki video will play when you open your PowerPoint on a different computer!

Using Embed Code

For PowerPoint 2010 users

  1. Click and copy your Voki embed code.
  2. Click on the Insert tab.
  3. Click on Video and select Movie from Website.
  4. Paste your embed code into the box.
  5. Click Insert.
  6. Now you have your Voki on your PowerPoint! To preview, just hit F5 on your keyboard!

For PowerPoint 2007

  1. Click and copy your Voki embed code.
  2. Open word document and paste the embed code.
  3. Find the value code with a hyperlink.
  4. Select and copy that hyperlink.
  5. Now, go into your PowerPoint and click on the Ribbon. The Ribbon opens the dropdown menu for PowerPoint.
  6. Click on PowerPoint Options and a new menu will open up.
  7. Make sure that the option for Show Developer tab in the Ribbon is checked. If not, click on it and click OK. The Developer tab will be added to your Ribbon.
  8. Click on the Developer tab.
  9. Click on the More Controls icon (the one with a hammer and a wrench) and a new menu will pop up.
  10. Scroll down to find Shockwave Flash Objects and click OK.
  11. You will see a + sign as your mouse cursor. Click and drag on a blank PowerPoint slide. This will create a big box with an X in the middle.
  12. Right-click on the box and click on Properties and a new menu will open.
  13. Find the Movie line and paste the Voki hyperlink into the blank area. Then close the Properties window.
  14. To preview, just hit F5 on your keyboard!

PowerPoint 2013

1. Click and copy your Voki embed code.

2. Open word document and paste the embed code.

3.Find the value code with a hyperlink.

4. Select and copy that hyperlink.

5. Now, go into your PowerPoint and click on File to open up the menu for PowerPoint and click on Option.

1

6. Click on Quick Access Toolbar.

27. From the Choose commands from: drop-down menu, locate and click the Developer Tab.

3

8. Locate and click on More Controls and click Add. It will appear on the top menu.

4

9. Click on More Controls.

5

10. Select Shockwave Flash Object.

6

11. You will see a + sign as your mouse cursor. Click and drag on the PowerPoint slide. This will create a big box with an X in the middle.

7

12. Right-click and select Property Sheet.

8

13. Find the Movie line and paste the Voki hyperlink into the blank area.

9

14. Find EmbedMovie and set it to True. Then close the Property window.

10

15. To preview, just hit F5 on your keyboard!

Note: To play your Voki using the embed code you must be connected to the internet.

Mac Users: Inserting Voki using the embed code may not work for Mac users, if you have any suggestions, please send it to feedback@voki.com. To insert Voki into your PowerPoint, use the direct link to your Voki or insert your Voki as a video.

Which method did you use to put your Voki on your PowerPoint presentation?

Have a comment or question for Voki? We are always here to help! Just send us an email at feedback@voki.com!

Until next time,

The Voki Team

Tip of the Week: Embed Voki on Google Site

Tip of the Week: Embed Voki on Google Site

Are you looking for different ways to share your Voki? You can always embed your Voki collection to your Google Site! If you attempted to embed your Voki on your Google Site (and failed), continue reading to learn how!

Just follow these simple steps and you can show off your Voki collection to everyone!

  1. Go on www.voki.com
  2. Publish your Voki.
  3. Select your Voki size.
  4. Click to copy your Voki embed code.
  5. Paste your embed code onto Word.
  6. Find the hyperlink starting with src=”http://vhss-d.oddcast.com.
  7. Copy the hyperlink.Note: To make the Voki link work on Google Site, add “s” to http.
  8. Go to sites.google.com. If you do not have a Google site created, click the Create button.
  9. Name your site.
  10. Click Create again.
  11. Click on the Edit button. It looks like a pencil.
  12. Click Insert at the top of the page.
  13. Click on More Gadget.
  14. Click on Include Gadget. If you cannot find it, search Include Gadget.
  15. Click on Select.
  16.  Paste the Voki hyperlink into the box and click OK
  17.  Click Save.

Now your Voki is embedded on your Google Site!

If you have any questions, comments, or suggestions for Voki, shoot us an email at feedback@voki.com!

Happy embedding!

The Voki Team

Voki Tip of the Week: How to Embed Voki Using Presets

Voki Tip of the Week: How to Embed Voki Using Presets

Embedding Voki with the publishing presets is easy! Showcase your Voki on Facebook, Friendster, Twitter and more with just a few clicks.

Step One: After you have created your Voki, added text or voice, and have it ready to go, click Publish Your Voki.

Step Two: Select the size in which you would like to display your Voki. We recommend choosing large for the full Voki effect!

Step Three: Choose the platform where you would like to post your Voki. If you do not see a quick option for a particular site or blog, grab the embed code below. Once you click the code, it is automatically copied and ready to paste on your website.

Some sites, such as WordPress, require a bit of massaging to embed your Voki on the page. For WordPress instructions, please check out our past Voki Tip of the Week, How to Embed Voki on WordPress.

We hope you have fun creating your Vokis and sharing them with your students, teachers, and friends! If you have any questions or issues with embedding, please let us know in the comments section or by sending us an e-mail to feedback@voki.com.

Sincerely,

The Voki Team

The Voki Classroom User Guide

The Voki Classroom User Guide

If you are a Voki Classroom user, you might want some help getting started. Depending on how much detail you want, you should take a look at the Voki Classroom Getting Started Guide, or the complete User Guide. This post is about some of the things you can learn in the User Guide.

If you have a question about Voki Classroom, the Voki Classroom User Guide probably has the answer! Chock full of step-by-step instruction and interesting tidbits, we have composed an easy to follow guide that will ensure a fun and successful Voki Classroom experience for teachers and students. Divided into three parts, the Voki Classroom User Guide takes you on a tour from initial set-up to reviewing and embedding your students’ Vokis.

Part I

What is Voki Classroom? Why should teachers use it? What are the benefits to using Voki Classroom? How is it organized?All of the questions above are answered in Part I, accompanied by visuals and information to help distinguish the difference between our free Voki service and Voki Classroom.

The Voki Classroom hierarchy is an important concept for every teacher to be familiar with as it is the key to understanding how data is organized and how it can be utilized efficiently. The classroom hierarchy serves as a useful visual that can help you understand the role of Voki Classroom for the teacher and the students. Once you understand how Voki Classroom is structured, the other elements become even easier to follow!

Part II

Next up is everything you need to know about getting started with Voki Classroom. Here, you will learn about the interface, as well as how to use some of the available tools to make logging in quick and easy.

Ultimately you, the teacher, are in charge of the information displayed in your account. Personal settings can be edited as you see fit and editing is a cinch! In this section you will also learn about Voki Classroom support and feedback.

As a Voki Classroom user, you are able to get unlimited e-mail support from our dedicated Support team (only available to Voki Classroom users). By taking advantage of the support tab in Voki Classroom, you won’t have to wait to get the answers you need. One of our support representatives will get back to you promptly with an answer!

Part III

Last but not least, our guide takes you through the process of putting Voki Classroom to use! Adding and editing students and their logins, creating and editing classes, and embedding and reviewing Vokis are all covered in Part III.

Here you will learn how to enter in your students’ information individually or by importing a list. Once you have added your students, you can assign them to the classes you created. The guide will show you how to do all this, as well as other tricks, such as making an Assignment “hidden” (making it invisible to the student until it is time to complete the assignments).

One of the advantages of using Voki Classroom is that you are no longer required to embed student Vokis onto a separate webpage. Voki Classroom provides a configurable Web page for each Assignment , and student Vokis are displayed automatically!

Voki Classroom is easy and fun but if you have any questions, keep in mind that you have the Voki Classroom User Guide and unlimited e-mail  support to help you out.

To view the Voki Classroom User Guide, visit Voki.com and click on the “Learn” tab. There, you will find the User Guide among many other useful tools to help you get the most out of your Voki experience.

Thank you for your support and on behalf of the entire Voki Team, we wish you a happy school year!

Voki Tip of the Week: Save your Voki as a video file!

Voki Tip of the Week: Save your Voki as a video file!

Some of our users have been wondering about turning their Voki scenes into .avi files (which stands for Audio Video Interleave). We’re here to help! It’s quite easy to create your Voki scene and add it wherever you like. It may take some time (and a little patience), but if we can do it, you can do it! 🙂

One of our tech savvy educators left a great tip via the Teacher’s Corner. Here’s how it works.:

  • Create a Voki.
  • Go to CamStudio (for example) and download the latest program;  it’s free.
  • Open the program and return to your Voki.
  • Drag the box over your Voki and press Record.
  • Play your Voki.
  • Stop recording when finished.

You can save your recording on your PC as a video file. You can then add it to a PowerPoint presentation, a website, or anywhere else for that matter. Give it a try!

voki

Got a Voki tip?

Share it in the “Voki in the Classroom” section and we might feature you right here, in the blog!